 Skip to content
Leveling your 3D Printer Bed is the foundation of successful printing. It ensures your first layer adheres smoothly, setting the stage for a flawless print. Without a level bed, you risk poor adhesion, warping, or uneven layers, leading to failed prints and wasted material.
A properly leveled bed offers numerous benefits. It improves print quality, reduces the chances of errors, and saves time by minimizing troubleshooting. Whether you’re a DIY enthusiast or a business owner, mastering this skill will elevate your 3D printing experience.
Don’t worry if it seems tricky at first. With the right steps and a bit of patience, you’ll achieve consistent, high-quality results. Whether you’re a hobbyist or searching for the best 3D printer for small business, mastering this process is essential. Let’s dive into why it’s so crucial and how you can perfect it.
Why Bed Leveling Matters
A level 3D printer bed is the foundation of successful prints. When the bed is uneven, it disrupts the delicate balance required for smooth first layers. This imbalance can lead to several frustrating issues.
If you’re new to leveling or working with entry-level machines, checking out some of the Best Budget 3D Printers can give you a clearer understanding of how modern printers handle bed stability. For example, many affordable models now include assisted leveling systems that help beginners achieve consistent first layers with minimal effort.
How an Uneven Bed Affects Print Quality
An unlevel bed causes the nozzle to be too close or too far from the surface. If the nozzle is too close, it can scratch the bed or clog the extruder. If it’s too far, the filament won’t adhere properly, leading to poor adhesion and warped prints. Uneven layers and gaps in the print are also common outcomes.
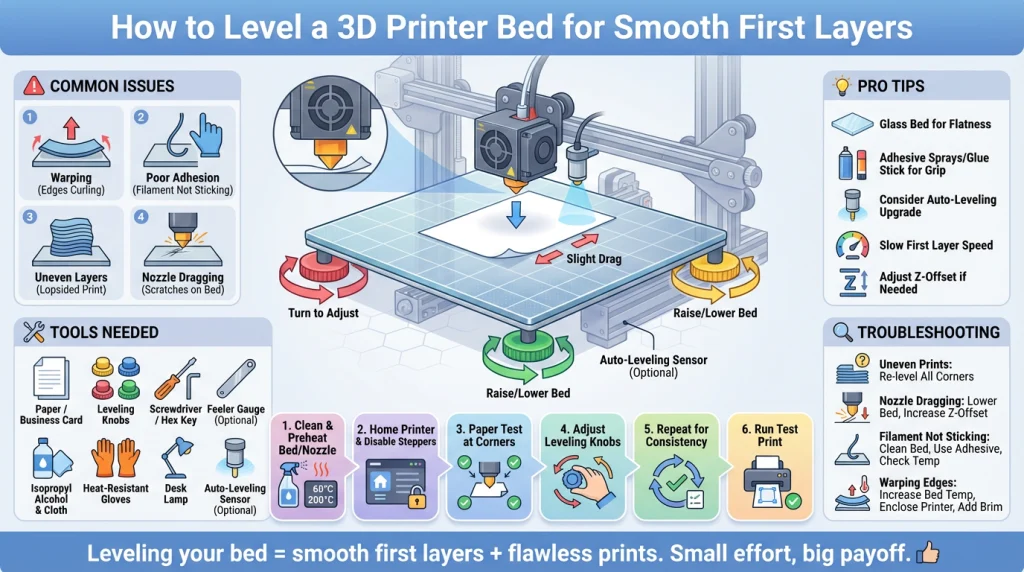
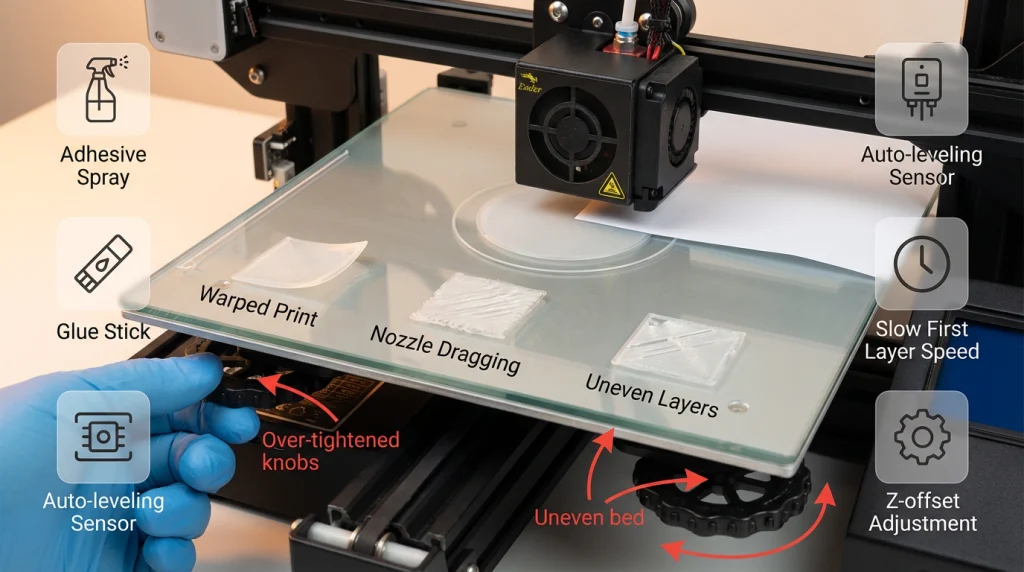
Common Issues Caused by an Unlevel Bed
- Warping: The edges of the print curl up due to uneven cooling.
- Poor Adhesion: The first layer doesn’t stick, causing the print to fail.
- Uneven Layers: The print appears lopsided or inconsistent.
- Nozzle Dragging: The nozzle scrapes the bed, damaging both the print and the surface.
Relating to Your Frustrations
If you’ve ever struggled with prints that won’t stick or models that look warped, you’re not alone. These issues can be disheartening, especially when you’ve invested time and effort into your project. The good news? Proper bed leveling can solve these problems and set you up for success.
This guide will walk you through the steps to level your bed effectively, ensuring smooth first layers and high-quality prints every time.
Tools You’ll Need for Bed Leveling
Leveling your 3D printer bed doesn’t require fancy gadgets. With a few simple tools, you can achieve a perfectly even surface for smooth first layers. Here’s what you’ll need:
- A Sheet of Paper
A standard piece of printer paper works wonders for manual leveling. It helps you gauge the gap between the nozzle and the bed. Some users also prefer a business card for its slightly thicker profile. - Leveling Knobs or Screws
Most 3D printers come with adjustable knobs or screws under the bed. These are used to fine-tune the bed’s height at each corner. - Screwdriver or Hex Key
If your printer doesn’t have knobs, you might need a screwdriver or hex key to adjust the screws. - Feeler Gauge (Optional)
For those who want extra precision, a feeler gauge can replace the paper method. It provides a consistent thickness for accurate adjustments. - Isopropyl Alcohol and a Clean Cloth
A clean bed is essential for proper adhesion. Use isopropyl alcohol to remove dust, grease, or leftover filament from the surface. - Heat-Resistant Gloves
If you’re leveling the bed while it’s heated, gloves can protect your hands from burns. - Lighting
Good lighting is crucial to see the nozzle’s position clearly. A desk lamp or portable light can make a big difference. - Optional: Automatic Bed Leveling Sensor
If your printer supports it, an auto-leveling sensor can save time and effort. It measures the bed’s surface and adjusts the nozzle height automatically.
With these tools in hand, you’re ready to tackle bed leveling like a pro. Remember, consistency is key, so take your time and double-check your adjustments.
A Step-by-Step Guide to Leveling Your 3D Printer Bed
Getting that perfect first layer is the secret to a great 3D print. A level bed provides the foundation for success. This guide will walk you through the manual bed leveling process. It’s a fundamental skill that will help you solve many common printing problems. Let’s get started.
Step 1: Prepare the Printer
Before you start adjusting anything, you need to get your printer ready. A clean and hot setup is crucial for accurate results.
First, clean your printer bed. Any old bits of filament, dust, or oils from your fingers can ruin your first layer. Use a soft cloth and some isopropyl alcohol to wipe down the entire surface. This ensures your new print will stick properly. Also, check your nozzle for any leftover plastic. Heat it to your usual printing temperature and gently wipe it clean with a cloth.
Next, preheat both the nozzle and the bed. Materials expand when they get hot. Leveling your printer at its operating temperature accounts for this thermal expansion. Set the temperatures you normally use for your filament. For PLA, this is often around 200°C for the nozzle and 60°C for the bed.
Step 2: Home the Printer and Move the Nozzle
Now that your printer is clean and warm, it’s time to set a starting point. Use your printer’s control screen to select the “Auto Home” function. This will move the print head to its origin, which is usually the front-left corner at the lowest point. This tells the printer where position (0, 0, 0) is.
After homing, you need to disable the stepper motors. Look for an option like “Disable Steppers” or “Motors Off” in the menu. This allows you to move the print head and bed by hand. You can now gently slide the nozzle around without resistance from the motors.
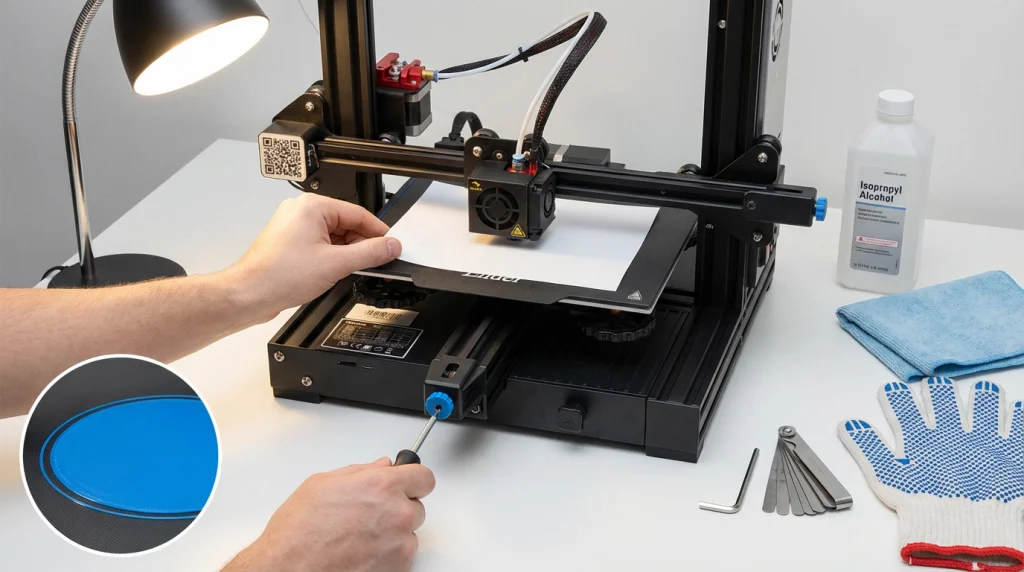
Step 3: Use the Paper Test
This is the classic method for checking nozzle-to-bed distance. It’s simple, effective, and only requires a standard piece of office paper.
Gently slide the print head over to one of the corners of the bed. Place your piece of paper on the bed, directly under the nozzle. The goal is to create a tiny gap between the nozzle and the bed. This gap should be about the thickness of the paper.
You are looking for a slight amount of drag on the paper. As you slide the paper back and forth, you should feel a little resistance from the nozzle. The paper should not move freely, but it also shouldn’t get stuck or tear. Getting a feel for this gentle friction is the key to perfect bed leveling.
Step 4: Adjust the Leveling Knobs
Your printer bed likely has adjustment knobs or screws in each corner. These controls raise and lower that section of the bed.
With the paper under the nozzle at the first corner, turn the closest knob. If there’s too much space, tighten the knob (or turn it in the direction that raises the bed) until you feel that slight drag. If the nozzle is too tight on the paper, loosen the knob to lower the bed. Make small, slow adjustments.
Once you have the right feel at the first corner, repeat the process. Move the print head to the other three corners. At each one, use the paper test and adjust the corresponding knob. It’s a good idea to check the center of the bed as well, especially if your build plate is large.
Step 5: Repeat for Consistency
Adjusting one corner can slightly change the others. Because of this, you need to repeat the process. Go back and check all four corners and the center again. This second pass will likely require much smaller adjustments.
Keep checking each point until you get the same gentle paper drag everywhere. This ensures the entire bed is parallel to the nozzle’s path. Patience here pays off. A truly level bed is a flat plane, and this iterative process helps you achieve it.
Step 6: Run a Test Print
The paper test gets you very close, but the final proof is in the print. Find a simple bed leveling test model online. These are usually large, single-layer squares or patterns that print across the entire bed.
Start the test print and watch the first layer closely.
- If the nozzle is too high: The plastic will come out as round, spaghetti-like lines. They won’t stick together or to the bed very well.
- If the nozzle is too low: The filament will be squashed too flat. It might even look transparent or have ridges between lines. This can damage your nozzle and bed.
- If the level is perfect: The lines will be slightly flattened and perfectly fused. The first layer will look like a single, smooth sheet of plastic.
If you notice uneven areas, stop the print and make fine nozzle adjustments to the knobs in those spots. Then, try the test again. Once you get that smooth first layer, you’re ready for successful 3D printing.
Common Mistakes to Avoid
1. Over-Tightening or Under-Tightening the Knobs
One of the most frequent errors is adjusting the bed leveling knobs too much or too little. Over-tightening can strain the bed springs, making it harder to achieve a level surface. On the other hand, under-tightening leaves the bed unstable, leading to uneven prints.
Solution: Turn the knobs gently and incrementally. Use the paper test to ensure the nozzle lightly grazes the paper without resistance. This balance ensures a stable and level bed.
2. Forgetting to Recheck After Adjustments
Many users assume that a single adjustment is enough. However, leveling one corner often affects the others. Skipping a recheck can result in an uneven bed, causing poor first-layer adhesion.
Solution: After adjusting all corners, repeat the process to confirm consistency. A quick recheck ensures the bed is uniformly leveled across the entire surface.
3. Skipping the Test Print Step
Skipping a test print is a common oversight. Without testing, you might not notice minor leveling issues until a larger print fails. This wastes time and filament.
Solution: Always run a small test print after leveling. A simple square or circle can reveal any inconsistencies. If the first layer looks uneven, revisit the leveling process before starting a full project.
Pro Tips for Perfect First Layers
- Use a Glass Bed for Consistency
A glass bed provides a smooth and even surface, ensuring better adhesion and a flawless first layer. It’s ideal for materials like PLA and PETG. Clean the glass bed with isopropyl alcohol to remove oils and residue for optimal results. - Adhesive Sprays and Glue Sticks
For tricky materials or uneven surfaces, a thin layer of adhesive spray or a glue stick can work wonders. These help the filament stick firmly to the bed, reducing the chances of warping or lifting. - Upgrade to an Auto-Leveling System
If manual leveling feels tedious, consider upgrading to an automatic bed leveling sensor. Devices like the BL-Touch make calibration easier and more precise, saving time and improving print quality. - Slow Down the First Layer Speed
Printing the first layer at a slower speed (15–25 mm/s) allows the filament to bond better with the bed. This ensures a strong foundation for the rest of the print. - Adjust the Z-Offset
Fine-tune the Z-offset to ensure the nozzle is at the perfect height. Too close, and the filament will squish; too far, and it won’t stick. Aim for slightly flattened lines with no gaps.
Troubleshooting Common Issues
- Uneven Prints
- Cause: Bed not level or incorrect Z-offset.
- Solution: Re-level the bed and adjust the Z-offset. Use a calibration print to test the settings.
- Nozzle Dragging
- Cause: Warping or uneven cooling.
- Solution: Increase cooling or control the enclosure temperature. Adjust Z-hop settings to prevent the nozzle from hitting the print.
- Filament Not Sticking
- Cause: Dirty bed or incorrect temperature.
- Solution: Clean the bed with isopropyl alcohol. Ensure the bed and nozzle temperatures match the filament’s requirements.
- Warping or Lifting Edges
- Cause: Poor adhesion or rapid cooling.
- Solution: Use a brim or raft to anchor the print. Reduce fan speed for the first few layers.
Summery
A level 3D printer bed is the foundation of successful printing. It ensures your first layer adheres properly, setting the stage for a flawless print. Without a level bed, you risk issues like warping, poor adhesion, or even failed prints. By following the steps outlined in this guide, you can achieve consistent results and enjoy a smoother printing experience.
Take the time to level your bed and test your first layers. It’s a small effort that pays off with better prints and less frustration. Whether you’re a beginner or a seasoned maker, mastering this skill will elevate your 3D printing game.
Frequently Asked Questions of 3D Printer Bed
Why is bed leveling important for 3D printing?
Bed leveling ensures the nozzle maintains a consistent distance from the print bed across the entire surface. This consistency is crucial for proper filament adhesion, smooth first layers, and avoiding issues like warping or failed prints.
How do I know if my 3D printer bed is unlevel?
Signs of an unlevel bed include:
Gaps between filament lines or filament piling up in some spots.
Filament not sticking to certain areas of the bed.
Uneven first layers with varying thickness.
Should I level the bed when it’s hot or cold?
It’s recommended to level the bed when it’s hot. Heating accounts for thermal expansion of the bed and nozzle, ensuring more accurate leveling for real printing conditions.
What is the paper test, and how does it work?
The paper test involves sliding a piece of paper between the nozzle and the bed. Adjust the bed screws until you feel slight resistance when moving the paper. Repeat this process for all corners and the center of the bed.
What is Z-offset, and why is it important?
Z-offset is the distance between the nozzle and the print bed. Adjusting it ensures the nozzle is neither too close (causing squished layers) nor too far (causing poor adhesion).
