
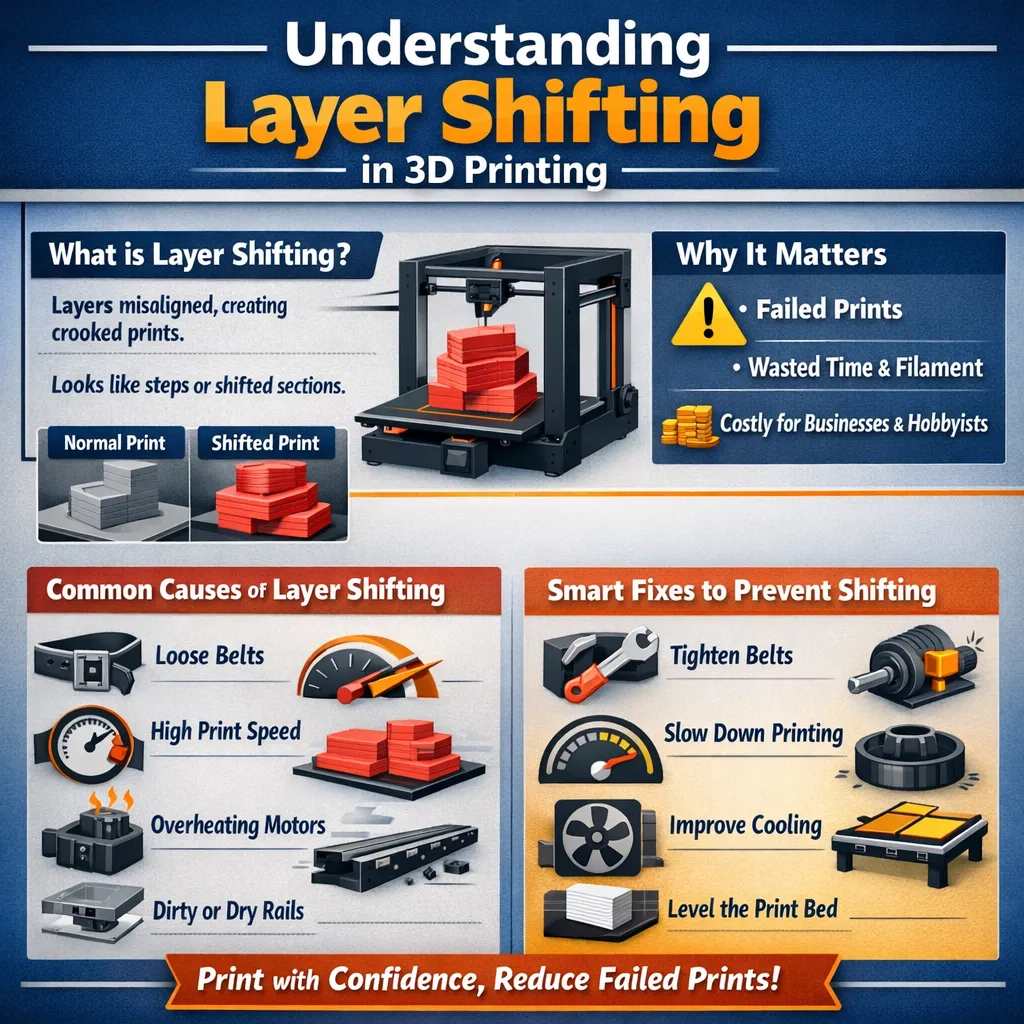
Layer shifting occurs when the layers of a 3D print move out of place during printing. Instead of stacking straight, they slide sideways, creating a crooked look. Learn how to fix layer shifting and prevent misaligned layers from ruining your final print.
Layer shifting wastes time and money. A long print may fail near the end after hours of work. Filament gets wasted, and the printer stays busy with no result. For small businesses, failed prints can delay orders and raise costs, especially if you don’t have the best 3D printer for small business. For home users, it turns a fun project into frustration.
This guide is for 3D printer users across the USA & Europe. It helps DIY makers, hobbyists, and small business owners. It focuses on real causes and practical fixes. The goal is to help you print with confidence and reduce failed prints.
What Layer Shifting Looks Like
Layer shifting happens when your 3D print layers don’t line up correctly. The most common sign is sideways layers. The top layers may slide to one side, making the walls look crooked. The bottom layers often stay fine, so the problem may appear only halfway through the print. It can be frustrating because your print starts perfectly, but suddenly looks wrong.
Another sign is sudden steps or offsets. Instead of smooth edges, some parts jump or shift out of place. This makes the print look staggered or broken. Steps usually happen when the printer head moves the wrong way on the X or Y axis. Spotting these signs early is key to understanding how to fix layer shifting before the entire print fails.
Layer shifting often starts mid-print. It can happen because belts are loose, motors slip, or parts get hot over time. Dust or debris on the rails can also push the print head out of place. Even a small bump can cause a sudden shift. Tall prints or long jobs are more likely to show this problem.
The Real Causes of Layer Shifting
When your 3D print layers don’t stack straight, it’s called layer shifting. This means the printer lost track of where it should move. The result is a crooked or misaligned model that looks twisted or off-center.
Here are the main causes that usually lead to layer shifting.
Loose or Worn Belts
Belts are the parts that move your printer’s head and bed along X and Y directions. When your stepper motor turns, it pulls these belts to move the print head exactly where it should go.
If the belts are too loose or worn out, they can slip on the pulleys. When a belt slips, the motor thinks the print head moved correctly, but it didn’t. That mismatch makes the layers placed in the wrong spot.
Check belt tension often. You want them firm, but not so tight that they strain the motor or bearings. If a belt feels soft or flaps when you move the carriage by hand, it likely needs tightening or replacement.
Print Speed Set Too High
Print speed controls how fast your printer moves during a job. Many hobbyists push speed high to save time. But that can lead to trouble.
When the head changes direction quickly at high speed, the motors can’t keep up. They start to skip steps because the torque isn’t enough to match the command speed. This makes the head pause or lag just enough to cause shifts on the next layer.
Long prints are especially prone to this. Speed stress builds over time, and skipped steps show up later in the print instead of early.
If your printer struggles at higher speeds, slow it down a bit. You’ll get more accurate movement and fewer layer problems.
Motor or Driver Overheating
Your printer’s stepper motors and motor drivers are the heart of movement. They need good cooling to keep running accurately.
If a motor gets too hot, it can lose torque. When this happens, a motor might miss steps and fail to put the print head where it belongs. Drivers can also slow down or temporarily shut off to protect themselves.
Overheating is common on long prints or inside poorly ventilated enclosures. If your motors feel burning hot instead of just warm, that’s a sign you need more airflow or cooling fans near the drivers.
Dirty or Dry Rails
The rails or rods guide your printer’s motion smoothly. Dust, dried grease, or debris can make these paths feel rough.
When rails are dirty or lack lubrication, the printer head or bed may stick or hesitate mid-move. This extra resistance can make the motor struggle for position. When it finally moves forward, the layers are no longer aligned perfectly.
Cleaning and re-lubricating these rails regularly will keep the motion smooth. Use a safe cloth and a light lubricant designed for 3D printers. This helps reduce friction and keeps the stepper motors from working too hard.
Bed or Nozzle Hitting the Print
Sometimes the printer head doesn’t just miss steps — it physically bumps into the print. This can happen because of poor adhesion or incorrect first-layer height.
If the first layer isn’t flat and well attached, the edges can lift or warp. When the nozzle runs into this lifted area, it can push the model or snag the filament. That collision moves the part slightly. The printer doesn’t notice this shift, so the next layers continue in the wrong place.
Warped parts and poor first-layer settings are common triggers. To learn how to fix layer shifting, start by leveling the bed and setting the nozzle at the correct height before printing.
Smart Fixes That Actually Work
Tighten and Align Belts
- Belts control X and Y axis movement; loose belts cause skipped steps.
- Simple tension check: Press the belt; it should feel firm like a low guitar twang.
- Signs for replacement: Cuts, frayed edges, hard spots, or worn teeth mean the belt needs replacement.
Slow Down Print Movement
- High print speed can overload motors and belts.
- Safe speed range: 40–60 mm/s for printing, travel speed ≤100 mm/s.
- Why slower works: Reduces vibration, stress on belts, and skipped steps, resulting in steadier layers.
Improve Cooling Around Motors
- Stepper motors and driver chips overheat during long prints, causing layer shifts.
- Airflow tips: Ensure fans near motors and boards are clean and working. Add case fans if needed.
- Room temperature advice: Keep the printer in a cool, well-ventilated space to maintain stability.
Clean and Lubricate Moving Parts
- Smooth rails and bearings prevent resistance and jerks.
- Parts to care for: Smooth rods, linear rails, lead screws, and bearings. Wipe off dust and debris.
- Frequency: Inspect and clean every few weeks; apply lubricant when parts look dry or rough.
Secure the Print Bed
- A stable bed prevents collisions and bumps that shift layers.
- Leveling basics: Level the bed before each print using paper or a leveling tool.
- Prevent sudden bumps: Tighten bed screws and frame bolts. Place the printer on a solid, vibration-free surface.
Key Settings That Help Prevent Layer Shifting
Layer shifting happens when the printer head loses position, ruining prints and wasting filament. Adjusting acceleration and jerk settings can prevent this.
Acceleration Control
Acceleration sets how fast the printer reaches its set speed. Too high, and belts can slip or motors skip steps. Lowering acceleration slows starts and stops, reduces stress, and keeps layers aligned. Most printers work well around 500–1500 mm/s², but test your machine for best results.
Jerk Settings Explained Simply
Jerk controls how quickly the printer changes direction. High jerk causes sudden movements, shaking the machine, and shifting layers. Lower values smooth transitions, keeping the print head steady. Typical ranges are 5–15 mm/s, adjustable in most slicers under “Enable Jerk Control.”
How These Settings Prevent Layer Shifts
High acceleration or jerk can make belts or motors lose grip, misaligning layers. Lower values create smoother movement, keeping layers aligned. Small adjustments often improve print quality noticeably.
How to Prevent Layer Shifting Long-Term
Layer shifting can ruin your 3D prints. The good news? You can prevent it with simple routines, pre-print checks, and smart habits.
1. Simple Maintenance Routine
- Check Your Belts – Belts move the print head and bed. Tighten them so they are firm but not too tight.
- Inspect Screws and Pulleys – Loose screws or pulleys let belts slip. Tighten every few weeks.
- Clean Rails and Bearings – Dust or debris can block smooth motion. Wipe rods and apply a drop of lubricant monthly.
- Secure the Printer Frame – A shaky frame causes shifting. Check all bolts and keep the printer stable.
- Update Firmware – New firmware can improve motion control and reduce skipped steps.
2. Pre-Print Checks
- Level the Bed – A flat bed keeps the first layer even. Poor first layers often cause shifts later.
- Run a Test Print – Small models, like an XYZ cube, reveal any alignment problems before big prints.
- Check Slicer Settings – Slower print speed and moderate acceleration reduce stress on belts and motors.
- Inspect Filament Feed – Make sure the filament moves freely. A tangled or stuck filament can cause skipped steps.
- Clear Obstructions – Keep cables and moving parts away from the print path to prevent sudden bumps.
3. Tips for Business Reliability
- Keep a Maintenance Log – Track belt checks, lubrication, and firmware updates. Consistency avoids mistakes.
- Print on a Stable Surface – Use a firm table and avoid high-traffic areas. Vibrations can shift layers.
- Train Your Team – Everyone should know how to check belts, screws, and slicer settings.
- Use Quality Components – Strong belts, pulleys, and bearings last longer and reduce errors.
- Calibrate Regularly – Monthly checks keep motion smooth and printers reliable for big jobs.
When Fixes Are Not Enough
Even after tightening belts and slowing print speed, your 3D printer can still shift layers. This usually means the problem runs deeper. At that stage, quick tweaks or slicer changes are not enough. How to fix layer shifting starts with spotting real wear signs or failing parts early. Catching these issues in time helps prevent bigger damage, costly failures, and repeated print loss.
When Belts Should Be Replaced
Belts control precise movement on the X and Y axes. Over time, they stretch, wear, or lose shape. A worn belt will not grip the motor pulley teeth the same way. When this happens, the motor will spin, but the print head won’t move as expected. This leads to misaligned layers.
Signs it’s time for a new belt:
- Visible wear, frayed edges, or cracking on the belt teeth.
- The belt slips when you lightly press it during movement checks.
- You tightened the belt many times, and it still slips or shifts.
- The belt shows uneven tension along its length.
Belts that are too old or damaged can’t hold tension well anymore. When that happens, simple fixes won’t stop the head from skipping steps and causing layer shifts. Replacing worn belts often restores consistent motion and stops recurring shifting.
When Motors May Fail
Stepper motors drive motion on all printer axes. If a motor begins to fail, it can’t hold torque or keep steps consistent. When that happens, layer shifts happen even if the belts and pulleys are correct.
Watch for these motor issues:
- The motor gets very hot during long prints. Hot motors can lose torque and skip steps.
- You hear a soft clicking sound while the printer moves. That can mean the motor missed steps.
- The same shift happens on prints even after other fixes.
Wiring and motor driver electronics can also fail and mimic a motor problem. When learning how to fix layer shifting, don’t focus on motors alone. If a driver overheats or sends unstable current, the motor can miss steps and lose position. In this case, checking the driver cooling, wiring connections, and power delivery should come before replacing the motor itself.
Upgrade vs Repair Decision
When a part wears out or repeatedly fails, you must decide whether to repair it or upgrade to a better component. Here’s a simple way to decide:
Repair when:
- Only one part shows wear, like a belt or pulley.
- The rest of the printer is solid and prints well.
- You want a low-cost fix that keeps the machine running reliably.
Upgrade when:
- You keep seeing the same problem even after repairs.
- You want stronger performance or more durability.
- You depend on the printer for frequent prints or business jobs.
For example, using stronger belts and better motors helps your printer move more steadily and wear out more slowly. Adding better cooling for motor drivers also helps prevent missed steps during long prints. These upgrades are an important part of how to fix layer shifting over time. They may cost more at first, but they often save money later by reducing failed prints and improving print quality.
Summery
Layer shifting occurs when your print’s layers misalign, causing stair-step or offset lines. The main causes are loose belts or pulleys, high print speeds, dirty or dry rails, and motors losing steps. These issues disrupt smooth movement and ruin prints.
Calm troubleshooting is key when learning how to fix layer shifting. Start with simple checks: tighten belts, slow the print speed, clean moving parts, and secure the printer on a stable surface. These step-by-step fixes solve most problems and help prevent repeat issues.
Understanding these causes builds confidence. You’ll notice warning signs early and act before a print fails. With practice, your prints will stay accurate, clean, and consistent—whether for DIY projects or small business production.
FAQs: How to Fix Layer Shifting
What causes layer shifting?
Layer shifting happens when the print head or bed moves out of sync. Common causes include loose belts, high speed, dirty rails, or motors skipping steps.
How do I know if a belt is loose?
If belts feel slack or move easily when pressed, they are too loose. Tighten belts and check pulley screws.
Why do shifts happen at certain heights?
Collisions with the print or improper Z hop settings can cause layer shifts mid-print. Adjust Z hop or cooling to prevent this.
Does print speed affect shifting?
Yes. Too fast movement can overload motors or pulleys. Slowing down speed and lowering acceleration usually fixes it.
Can electronics or wiring cause shifts?
Loose wires or overheating motor drivers can interrupt signals, causing layers to misalign. Secure connections and ensure proper cooling.
What if belts are fine but layers still shift?
Check for dirty rails, vibrations, bed adhesion issues, or aggressive firmware/slicer settings. One small snag can cause shifting.
Can slicer or G-code settings cause shifting?
Yes. Overly aggressive speed, acceleration, or jerk settings can create layer shifts. Re-slice with moderate settings.
Does poor bed adhesion lead to shifting?
Yes. If the base warps or lifts, the nozzle may push layers sideways. Ensure proper leveling, temperature, and surface.