 Skip to content
As a seasoned 3D-printing expert, I’ll show you how a filament maker DIY setup slashes costs, improves print quality, and helps recycle waste efficiently.
From top guides, this article shows how to control melt temperature, remove moisture, and get precise diameter results. You’ll learn how to prep pellets, build a reliable extruder, and test your filament with simple tools. We also cover budget-friendly sensors for live diameter feedback and eco-friendly recycling tips that most guides skip. These insights are especially helpful if you’re pairing your setup with the best 3d printer for small business to keep production quality high.
By the end, you’ll know exactly how to turn raw plastic into top‑notch, consistent filament for both hobby and small‑scale production.
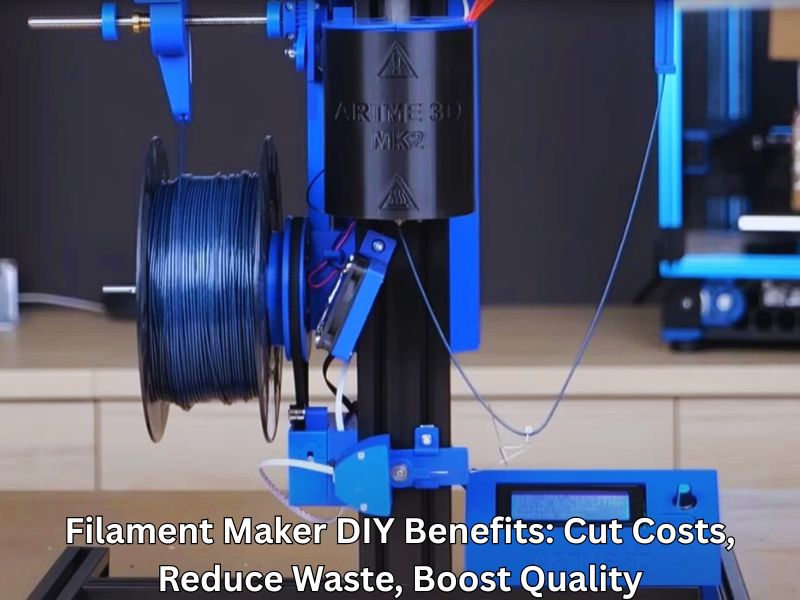
Filament Maker DIY Benefits: Cut Costs, Reduce Waste, Boost Quality
Building a filament maker DIY setup saves cash and cuts trash. You steer every strand for crisp, reliable prints. A home filament extruder delivers fresh stock on demand and avoids shipping delays.
Comparing Commercial Spool Prices to DIY Cost per Kilogram for PLA, ABS, and PETG
Store spools often cost twenty to thirty dollars per kilogram. Raw PLA, ABS, or PETG pellets for a DIY filament maker run three to five dollars. Even after accounting for energy and wear, a filament maker diy setup keeps costs under ten dollars per kilogram. If you’re running a 3D Picture Printer, these savings add up fast. The more batches you produce, the sooner you’ll reach the break-even point.
Turning Failed Prints and Household Plastics into New Filament to Slash Landfill Waste
Every failed print becomes fresh feedstock. Grind, dry, and re-extrude; nothing goes to waste. Clean PET bottles, food tubs, and scrap shards blend in easily. This local recycling loop shrinks your carbon footprint while lowering material bills. With a DIY filament maker setup, you can turn waste into quality filament. Recycled filament also adds an eco-story that attracts green-minded buyers.
Essential Tools, Parts, and Safety Gear for a Reliable DIY Filament Extruder Setup
Building your own filament maker diy setup requires the right parts and safety gear. This includes essential core hardware, useful support tools, and important safety measures. Here’s what you need to know.
Core Hardware: Motor, Auger Screw, Heater Bands, Barrel, and Precision Nozzle
The heart of your filament maker starts with strong core parts.
- Motor and Gearbox: Choose a motor with enough torque, like a NEMA 17 or a small industrial motor paired with a gearbox. This combination pushes plastic steadily without overheating or stalling.
- Auger Screw: Use a properly machined extrusion screw. It helps melt the plastic evenly and keeps flow smooth. The screw must fit tightly inside the barrel to avoid leaks or air gaps.
- Barrel: The barrel contains the screw and plastic as they melt. It needs to be sturdy and aligned perfectly with the screw for steady extrusion.
- Heater Bands and Temperature Control: Use multiple heater bands around the barrel and nozzle. Add PID controllers to keep the temperature steady. This prevents burnt plastic or clogs.
- Precision Nozzle: The nozzle size affects filament thickness. Most DIYers use around 1.5 mm. Adding a small filter or breaker plate before the nozzle helps catch impurities and bubbles.
Choosing the Right Auger Screw for Smooth, Consistent Filament
Select a screw explicitly designed for plastic extrusion, rather than for wood or grain. It should have a slight taper to compress the plastic evenly. This helps keep your filament smooth and strong. Using the right screw is one of the key secrets in a filament maker diy setup.
Support Equipment: Pellet Grinder, Cooling Fans, Diameter Gauge, and Automatic Spooler
Extra tools help make your filament more reliable.
- Pellet Grinder: If you recycle old prints, shred them evenly first. Clean, dry pellets melt better.
- Cooling System: Use fans or a water bath right after extrusion. This cools the filament quickly and maintains a steady diameter.
- Diameter Gauge: Check filament thickness regularly. A digital caliper works well. Some DIYers use simple optical sensors for real-time measurement.
- Automatic Spooling: An automatic winder keeps filament tight and prevents tangles. Match the pull speed to your extrusion rate for smooth spooling.
Workshop Safety: Heat Shields, Ventilation, and Electrical Safety Practices
Safety matters when handling hot plastics and electricity.
- Heat Protection: Cover hot parts with heat-resistant tape or shields. This protects your hands and nearby objects.
- Ventilation: Melted plastic can release fumes. Work in a well-ventilated space or use a fan and air filter to keep the air fresh.
- Electrical Safety: Use grounded outlets and GFCI plugs. Keep wiring neat and insulated. If unsure, ask an expert to help with electrical setup.
This DIY filament maker setup will help you create quality filament safely and efficiently. When your tools and safety gear are right, you get better results with less hassle.
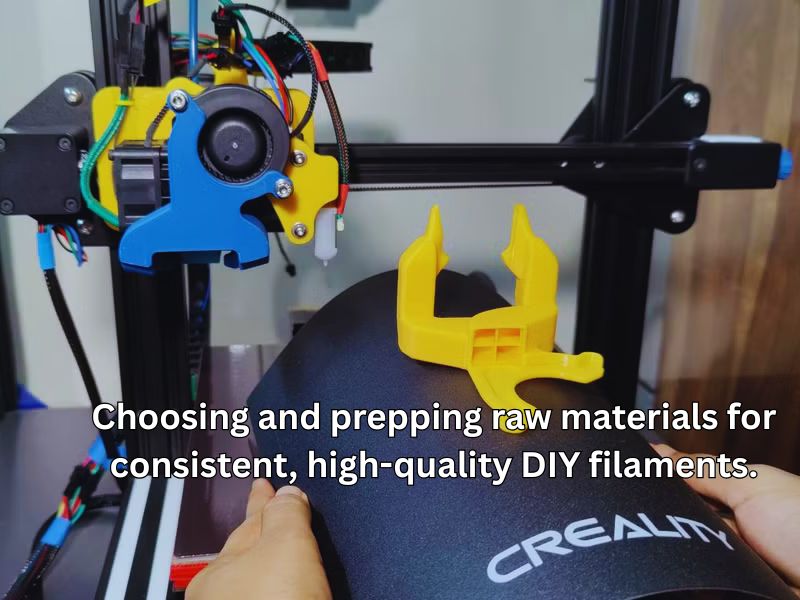
Selecting and Preparing Raw Materials for Consistently High-Quality DIY Filaments
Making your own filament can save money and reduce plastic waste. But the quality depends heavily on the materials you choose and how you prepare them. With the right steps, your filament maker diy setup will produce strong, consistent filament that works well for your 3D prints. Here’s a simple guide to get it right.
Virgin Pellets vs. Recycled PLA, ABS, PET Bottles: Pros, Cons, and Quality Tips
Virgin Pellets:
- Pros:
- Provide consistent quality for smooth printing.
- Less chance of contamination or print failures.
- Provide consistent quality for smooth printing.
- Cons:
- Usually cost more.
- Using new plastic isn’t as eco-friendly.
- Usually cost more.
Recycled Plastics:
- Pros:
- Help cut costs and reduce waste.
- Often easier to find locally.
- Help cut costs and reduce waste.
- Cons:
- Quality can vary and cause issues.
- Must be cleaned well to avoid impurities.
- Quality can vary and cause issues.
Tips:
- Always use clean, sorted plastics.
- Adjust your extruder settings for recycled materials.
- Check filament diameter regularly for uniformity.
Cleaning, Drying, and Shredding Plastics to Remove Moisture and Debris
Good prep makes better filament.
Cleaning:
- Remove labels, caps, and non-plastic bits.
- Wash thoroughly with mild soap and water.
Drying:
- Plastics absorb moisture, which harms prints.
- Dry in a low-heat oven (around 60°C) for a few hours.
- Or use a specialized dehumidifier dryer.
Shredding:
- Shred plastics into small pieces using a plastic shredder.
- Wear safety gear and follow instructions carefully.
Blending Color Masterbatch and Strength-Boosting Additives for Custom Properties
Customize your filament’s look and strength.
Color Masterbatch:
- Concentrated color mix added to base plastic.
- Use about 2-5% for rich colors without damage.
Strength Additives:
- Add fillers like glass fibers or carbon for toughness.
- Use plasticizers for flexibility.
- Stabilizers protect against heat and UV damage.
- Use small amounts to avoid clogging or weak spots.
Choosing the right materials and preparing them carefully is key to making strong, reliable filament at home. A good filament maker diy process starts with clean, dry plastics and the right additives to boost strength and color.
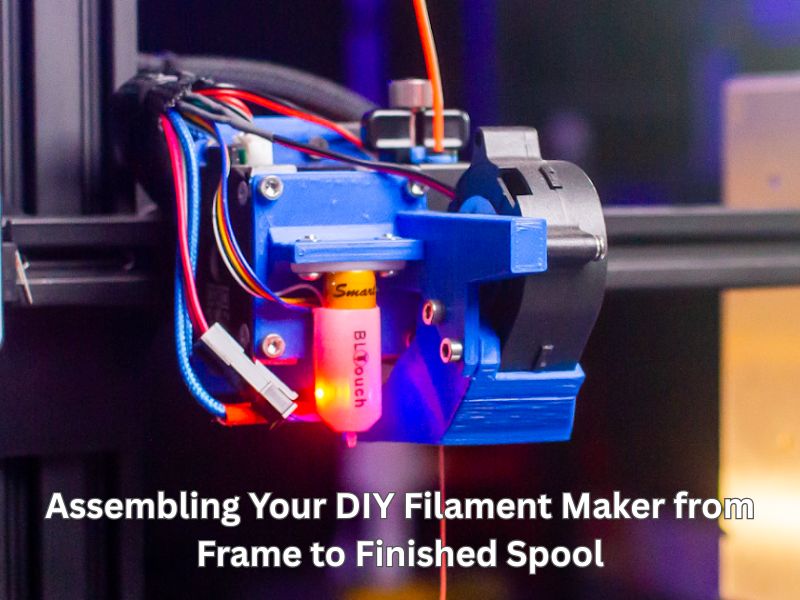
Step-by-Step Build Guide: Assembling Your DIY Filament Maker from Frame to Finished Spool
Building your own filament maker diy can save money and give you full control over your 3D printing materials. Here’s a simple step-by-step guide to help you assemble it easily.
Constructing the Rigid Frame and Mounting the Drive Motor for Vibration-Free Operation
- Frame Construction: Use strong materials like steel or aluminum to build a solid frame. Make sure the frame fits all parts well.
- Motor Mounting: Secure the drive motor firmly at the back. Use vibration-damping mounts to reduce noise and movement.
- Alignment Check: Manually turn the auger to make sure it moves smoothly without any jams.
Installing Triple-Zone Heaters and Digital Controllers for Stable Melt Temperatures
- Heater Installation: Attach band heaters at three points along the barrel—feed, melt, and nozzle zones—to keep the plastic evenly heated.
- Thermocouple Placement: Place sensors near the nozzle to monitor temperature closely.
- Controller Integration: Utilize a digital PID controller to maintain a steady and precise temperature.
Creating a Controlled Water- or Air-Cooling Path and Guide Plate for Diameter Consistency
- Cooling System Design: Set up water or air cooling right after the nozzle. Water troughs or fans work well.
- Guide Plate Fabrication: Add an adjustable guide plate with rollers to maintain steady filament tension and prevent sagging.
- Calibration: Regularly check the filament diameter and adjust the cooling and guide plate settings as needed to maintain consistent thickness.
Building an Automatic Spooling System to Prevent Twists, Tangles, and Knots
- Spool Holder Construction: Use a spool holder that spins freely with bearings or an axle.
- Tension Control: Add a tension mechanism, such as a spring arm or brake, to maintain the filament‘s tension.
- Spool Alignment: Ensure the filament winds evenly on the spool to prevent tangles.
- Automation Option: Consider using a stepper motor synced with extrusion speed for automatic spooling.
Following these steps will help you build a filament maker diy that produces smooth, consistent filament. This setup keeps your prints reliable and your costs low. Regular checks and care will ensure your machine runs well for a long time.
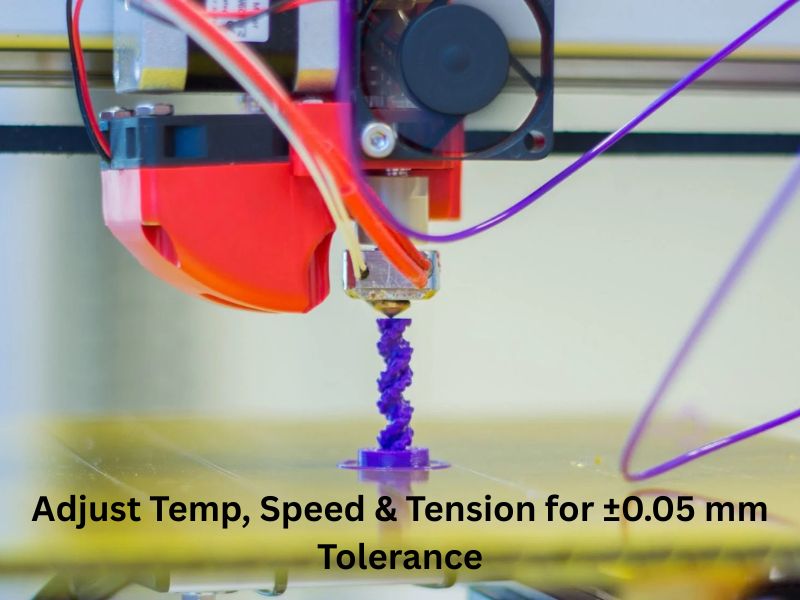
Calibration Secrets: Fine-Tuning Temperature, Speed, and Puller Tension for ±0.05 mm Diameter Tolerance
Getting your DIY filament maker to produce filament with a tight ±0.05 mm diameter takes careful calibration. The three key factors are extrusion temperature, extrusion speed, and puller tension. Each affects the filament’s quality and consistency.
- Extrusion Temperature: Start with the recommended temperature for your plastic type. Test small changes in 5°C steps to find the perfect melt. Too hot causes stringing; too cool leads to clogs. Different materials, such as PLA or ABS, require different temperatures.
- Extrusion Speed: Set a moderate speed to keep the flow steady. If the filament is uneven or thick in places, adjust the feed rate accordingly. Balance speed with cooling so the filament hardens smoothly without deforming.
- Puller Tension: Adjust the puller rollers to apply just enough pressure. Too tight stretches the filament, too loose causes slack and thickness variations. Check roller alignment for smooth, even pulling.
To check your work:
- Use digital calipers to measure the diameter at several points.
- Print test pieces to see how your filament performs in real prints.
- Keep notes and tweak settings as needed for consistent results.
Fine-tuning these settings regularly will help you produce high-quality filament that prints reliably every time. Small adjustments can make a big difference when using a filament maker diy setup to ensure your prints come out perfect.
Quality Assurance: DIY Tests to Verify Strength, Moisture Level, and Dimensional Accuracy of Homemade Filament
Ensuring your DIY filament is top quality is key to smooth and strong 3D prints. Here are simple tests you can do at home to check your filament’s strength, moisture, and size consistency.
- Tensile Strength Testing: Print small test bars and gently pull them until they break. This indicates the strength of your filament and how well your prints will hold up.
- Moisture Content Analysis: Weigh a short piece of filament, then dry it in an oven or filament dryer. Weigh again. If the weight drops, your filament has moisture—dry filament results in fewer print issues, such as bubbling or stringing.
- Diameter Consistency Check: Use calipers to measure your filament’s thickness at many spots. Aim for less than 0.05 mm difference across the spool. Consistent diameter helps avoid clogs and uneven extrusion.
- Layer Adhesion Evaluation: Print a multi-layer sample and look for any layer separation. Good adhesion ensures your final prints are strong and less prone to cracking.
- Flow Rate Calibration: Print a calibration cube and measure it. If it’s too small or big, adjust your printer’s extrusion settings. This keeps your printed parts accurate and precise.
Doing these easy tests regularly helps you make better, more reliable filament. Using a filament maker diy ensures consistent quality. Better filament means better prints — less frustration and more success.
Troubleshooting Guide: Fixing Bubbles, Burn Marks, and Color Streaks in DIY Filament
When making your own 3D filament, small flaws like bubbles, burn marks, and color streaks can happen. These issues hurt your print quality. Here’s how to fix them fast.
Bubbles in Filament
- Moisture Absorption: The filament absorbs water from the air. When heated, this water turns to steam, causing bubbles.
- Inconsistent Extrusion: Uneven speed or temperature traps air, creating bubbles.
Fix it by:
- Drying the Filament in a filament dryer or low-temp oven before use.
- Storing properly in airtight containers with desiccants to keep moisture out.
- Controlling Extrusion Settings for Steady Speed and Temperature.
Burn Marks on Prints
- Overheating: Excessive heat damages the filament, resulting in burn spots.
- Old Filament: Filament that’s stored poorly breaks down and burns more easily.
Fix it by:
- Lowering the Print Temperature slightly to avoid burning.
- Using Fresh Filament that’s stored dry and sealed.
- Cleaning the Hotend often to remove burnt residues.
Color Streaks in Prints
- Contaminated Filament: Mixing colors or brands causes uneven streaks.
- Inconsistent Extrusion: Fluctuating flow leads to color patches.
Fix it by:
- Using One Color or Brand to keep consistency.
- Calibrating Extrusion for smooth and even flow.
- Flushing the Extruder when changing colors to clear leftovers.
Fixing these common problems will help you produce smooth, strong, and beautiful DIY filament prints every time. Using a filament maker diy approach ensures you have better control over quality, allowing you to customize your filament to suit your printing needs perfectly.
Advanced Upgrades: Transforming a Hobby Filament Maker into a Small-Scale Production Line
Turning your DIY filament maker into a small production setup is easier than you think. Adding precision sensors helps keep filament diameter steady and reduces waste. Many hobbyists use automated spooling systems to save time and avoid tangles during long runs. Designing with modular parts makes it simple to upgrade and fix your machine as needed. Plus, connecting your filament maker with your 3D printers creates a smooth workflow, ensuring the filament fits your printing needs ideally.
Safety, Compliance, and Sustainability for Home Filament Production in the USA
Home filament making can be safe and green when you follow some key steps:
- Use electrical components rated for high heat and voltage. Proper wiring and grounding are essential to prevent accidents.
- Install effective ventilation systems, such as fume extractors equipped with HEPA and carbon filters, to maintain clean air quality during the extrusion process.
- Store and handle materials carefully to prevent moisture and contamination that hurt filament quality.
- Focus on recycling plastics to reduce waste and save money by reusing failed prints or local plastic scraps.
- Stay updated on local safety and environmental rules to keep your hobby legal and responsible.
Final Thought
Mastering DIY filament maker secrets offers serious rewards. You gain control over filament quality, reduce costs, and help the planet by recycling plastics from failed prints and bottles. Adding advanced upgrades—like optical diameter sensors or composite blending—can turn your hobby setup into a small-scale production line.
By focusing on safety, moisture control, and consistent calibration, you’ll produce reliable, professional-grade 3D printing filament at home. As recycling hubs grow and circular economy networks expand, your filament maker diy efforts contribute to an eco-friendly future. This journey builds skills, sustainability, and print performance—all from your own workshop.
Frequently Asked Questions
What is a DIY Filament Maker or Extruder?
A DIY filament maker, or filament extruder, is a machine you build yourself (or from a kit) that melts plastic feedstock—such as raw plastic pellets or shredded failed 3D prints—and pushes it through a precision nozzle to create new, spooled 3D printer filament (typically 1.75 mm or 2.85 mm).
Is making my own filament worth the investment, and what is the ROI?
Yes, for certain users.
Return on Investment (ROI): The ROI is often quicker than people realize. While the initial cost for a quality DIY setup can range from a few hundred to over a thousand dollars, consistent production (especially for popular materials like PLA and ABS) will quickly bridge the cost gap, particularly if you purchase pellets in bulk.
Cost Savings: Virgin plastic pellets (the raw material) can cost as little as $3 to $5 per kilogram, compared to commercial spools which typically cost $20 to $30 per kilogram. Even accounting for energy and machine wear, your cost per kg can be under $10.
Recycling: You can recycle your failed prints, support material, and even certain types of post-consumer plastic waste, turning a negative cost (trash) into a usable asset (filament).
What are the biggest challenges of using a DIY filament extruder?
The main challenge is achieving consistent filament diameter and material quality, which can be affected by several factors:
Assembly and Calibration: DIY kits can be complex to assemble and require significant time fine-tuning temperature, auger speed, and puller tension to achieve acceptable quality.
Diameter Tolerance: Hobbyist machines often struggle to match the tight tolerances (e.g., ±0.02 mm) of industrial-grade filament. Variations in diameter can lead to clogs or inconsistent extrusion on your 3D printer.
Inconsistent Extrusion: DIY extruders may lack the advanced heating and cooling zones of commercial units, leading to uneven melt flow, which can cause bubbles (due to moisture) or diameter fluctuations. Insufficient motor torque can also cause the auger to stall, resulting in inconsistencies.
Material Preparation: Recycled plastics must be thoroughly cleaned, shredded, and completely dried to avoid impurities and moisture, which are the primary causes of weak filament or print failure.
What materials can I use, and how do I handle recycled plastics?
You can extrude most common thermoplastics:
- Common Materials: PLA, ABS, PETG, TPU, Nylon, and PP are widely used. You must ensure your extruder can reach the required melting temperature for higher-temp materials like Nylon.
- Recycled Plastic: To use failed prints or post-consumer waste (e.g., clean PET bottles):
- Clean: Thoroughly wash plastics to remove dirt and labels.
- Shred: Grind or shred the plastic into small, consistent pieces (pellets) to ensure even melting in the barrel.
- Dry: Plastics absorb moisture from the air. You must dry your material in a low-heat oven (approximately 60°C) or a dedicated dehumidifying filament dryer for several hours before extrusion. Moisture will cause air bubbles in your filament, leading to weak prints.
What diameter tolerance can I realistically achieve with DIY filament?
Tolerance is the measure of how much the filament diameter deviates from the target (1.75 mm or 2.85 mm).
| Extruder Type | Typical Tolerance | Impact on Printing |
| Industrial/Premium Commercial | ±0.02 mm or better | Flawless, professional prints. |
| Advanced DIY/Kit (e.g., Filastruder) | ±0.03 mm | Acceptable for most functional and aesthetic prints. |
| Basic DIY/Hobbyist (e.g., Felfil Evo) | ±0.05 mm to ±0.07 mm | May cause occasional print defects or clogs on high-precision printers. |
