
When you slice a model, infill density is a vital setting you will choose. It is one of the most important factors for a successful print. Infill directly controls your object’s strength and weight. It also affects your material usage and total print time. Yet, many beginners do not fully understand this setting. They struggle to pick the right percentage for their project.
This guide explains infill density in simple terms, using clear examples to help you master this fundamental setting. You will also learn the best percentages for every type of print. Whether you’re a hobbyist or searching for the best 3D printer for a small business, understanding infill density is key to creating better, stronger, and more efficient 3D prints.
What Is Infill Density?
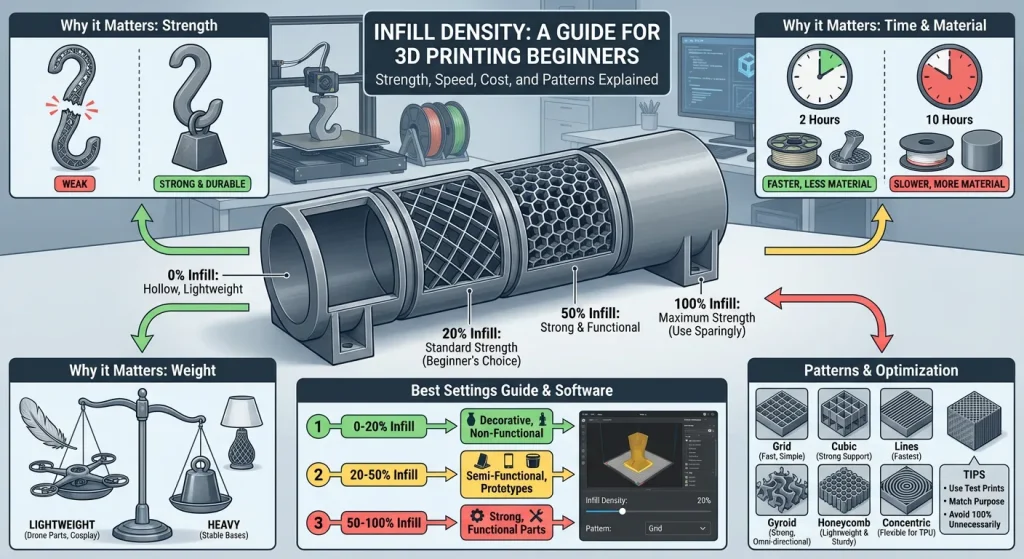
Infill density refers to how much material is inside your printed object. It defines the internal structure of your print. You can think of it as the “stuffing” inside a pillow. A higher percentage means more material inside, making the object fuller and more solid. A lower percentage means less material, making it lighter and more hollow.
Sometimes, even with proper infill, issues like a Layer Shifting 3D Printer can occur. For example, if your printer’s belt slips or the stepper motor misses a step, layers may misalign, causing the print to shift sideways.
Most 3D printing software represents this setting as a percentage. This value tells the printer how tightly to pack the internal structure. It is a key factor in balancing strength, cost, and print duration.
Here are some simple examples:
- 0% infill means your object will be completely hollow.
- 20% infill provides standard strength for most common prints.
- 100% infill makes your object completely solid.
Why Does Infill Density Matter?
In 3D printing, what’s on the inside counts just as much as what’s on the outside. Infill density controls the internal structure of your print. It determines how much material fills the hollow space inside your object. Think of it like the stuffing in a pillow; you can make it light and airy or firm and packed. This choice has a big impact on your final product.
Changing the infill density allows you to fine-tune your object’s final characteristics. It’s a key part of balancing structural integrity with efficiency. Let’s explore how this simple setting affects your 3D prints in three major ways.
Print Strength and Durability
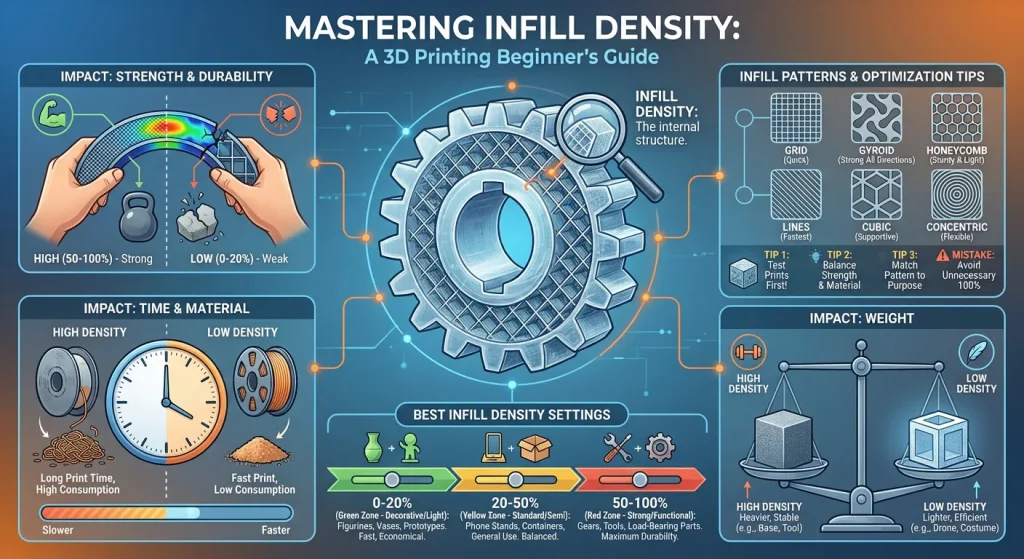
The most direct impact of infill density is on your object’s strength. A higher infill percentage creates a more solid internal structure. This makes the print much stronger and more durable. The internal lattice acts like a skeleton, helping the object resist bending, breaking, and pressure. If you are printing a part that needs to withstand force, increasing the infill is crucial for better 3D printing strength.
For example, a print with 50% infill can handle significantly more stress than one with just 15%. This added toughness is perfect for functional items. However, remember that more isn’t always better. For many projects, a moderate infill provides plenty of strength without going overboard.
- High-Density Example: Use a higher infill percentage for a functional tool, like a wrench or a bracket. These items need maximum strength to work correctly without failing under stress.
- Low-Density Example: A decorative vase or a display figurine doesn’t need to be strong. A low-density setting is perfect, as the part won’t face any physical strain.
Print Time and Material Consumption
Infill density also directly affects how long a print takes and how much filament it uses. A higher density means your printer must lay down more material inside the object. This process significantly increases the total print time. It also consumes more of your filament, which raises the cost of each print.
If you want to print faster and save material, using a lower infill density is a smart move. This is ideal for quick prototypes or large objects where a solid interior isn’t necessary. You can produce models more quickly and cost-effectively. Finding the right balance between speed, cost, and strength is one of the most important skills in 3D printing. The best infill settings will depend on your project’s specific needs.
- High-Density Example: Printing a solid cube at 100% infill will take a long time and use a lot of material.
- Low-Density Example: For a quick test print of a new design, a low infill percentage of 10-20% is efficient. It saves time and filament while still showing you the object’s shape and size.
The Overall Weight of the Object
Finally, infill density determines the final weight of your printed object. A higher infill percentage results in a denser, heavier part. A lower percentage creates a lighter, mostly hollow object. The weight might not seem important for every project, but it can be a critical factor in certain applications.
For instance, if you are creating parts for a drone or a model airplane, every gram matters. Lighter components help improve flight time and performance. On the other hand, sometimes you might want an object to have more heft. A heavier base for a lamp or a trophy can make it feel more stable and substantial.
- High-Density Example: You might want a higher infill for the base of a board game piece to keep it from tipping over easily.
- Low-Density Example: For parts of a cosplay costume, low density is ideal. It keeps the pieces lightweight and comfortable to wear for long periods.
Best Infill Density Settings for Beginners
Choosing the right infill density is essential for balancing strength, weight, and material usage in 3D printing. Here’s a simple guide to help beginners:
1. 0-20% Infill Density: Lightweight and Decorative Prints
- Ideal for non-functional items like figurines, vases, or display models.
- Keeps prints lightweight and reduces material usage.
- Prints faster due to minimal internal structure.
2. 20-50% Infill Density: Semi-Functional Objects
- Perfect for items that need moderate strength, such as containers or prototypes.
- Balances durability and material efficiency.
- A great starting point for most projects.
3. 50-100% Infill Density: Strong and Functional Parts
- Best for mechanical components, tools, or load-bearing parts.
- Provides maximum strength but increases print time and material consumption.
- Use only when strength is critical.
Adjusting Infill Density in 3D Printing Software
Most slicer programs, like Cura, PrusaSlicer, or QIDI Studio, allow you to set infill density as a percentage. These tools often include presets like “Draft,” “Standard,” or “Strong,” which adjust infill density automatically. Beginners can start with 20% density and experiment based on their project needs.
Pro Tip for Beginners
Start with 20% infill density for general-purpose prints. Gradually adjust based on the strength and material requirements of your project. Test different densities to find the perfect balance for your specific needs.
Tips for Optimizing Infill Density
- Use Test Prints to Find the Best Settings
Start with small test prints to experiment with different infill densities and patterns. This helps you identify the ideal balance between strength, material usage, and print time for your specific project. For example, try 20% infill with a grid pattern for lightweight items and 50% with gyroid for functional parts. - Balance Strength and Material Usage
Adjust infill density based on the purpose of your print. For decorative items, 0-15% density saves material and reduces print time. For functional parts, 50-100% density ensures durability. Always consider the trade-off between strength and material consumption. - Experiment with Infill Patterns
Different patterns offer unique benefits. For instance:- Grid: Simple and quick, suitable for prototypes.
- Gyroid: Strong in all directions, ideal for mechanical parts.
- Honeycomb: Lightweight yet sturdy, great for structural components.
Test various patterns to see which works best for your project.
- Understand the Purpose of the Print
Before choosing infill settings, consider the object’s use. A decorative vase doesn’t need high density, but a tool handle does. Matching the infill to the print’s purpose ensures efficiency and functionality.
Common Mistakes to Avoid
- Using 100% Infill Density Unnecessarily
Many beginners assume that solid prints are always stronger. However, 100% infill often wastes material and increases print time without significant strength benefits. Instead, use 50-70% density with a strong pattern like gyroid or cubic for most functional parts. - Ignoring the Impact of Infill Patterns
Choosing the wrong pattern can compromise strength or waste material. For example, using a simple lines pattern for a load-bearing part may lead to failure. Opt for patterns like gyroid or honeycomb for better structural integrity. - Not Considering the Object’s Purpose
Printing every object with the same infill settings is inefficient. For instance, a display model doesn’t need high density or complex patterns. Tailor your settings to the object’s function to save time and resources.
Solutions to These Mistakes
- Optimize Density: Use 20-50% infill for most projects. Increase density only for parts under heavy stress.
- Choose the Right Pattern: Match patterns to the object’s needs. Use the gyroid for strength, the honeycomb for lightweight designs, and the grid for quick prints.
- Plan Ahead: Think about the object’s purpose before printing. This helps you select the best combination of density and pattern.
These tips and solutions will help you achieve efficient, high-quality 3D prints while minimizing waste and maximizing performance. Let me know if you’d like further refinements!
Best Infill Patterns for Your Prints
Besides density, the pattern of the infill also matters. Infill patterns are the specific shapes your printer creates inside the object. Different patterns offer unique benefits. Some are designed for strength, while others are built for speed.
For Maximum Strength
These patterns create robust internal lattices. They are great for parts that will face stress.
- Gyroid: This complex, wavy pattern provides excellent strength in all directions. It is a popular choice for durable prints.
- Cubic: This pattern creates stacked, tilted cubes. It offers great support and strength.
For Faster Print Speeds
If your priority is speed, these patterns are ideal. They use simple movements to fill the object quickly.
- Lines: The printer moves back and forth in a single direction. It is one of the fastest patterns available.
- Zigzag: This is similar to lines but creates a continuous path. It reduces travel moves and can print very quickly.
For Flexible Prints
When printing with flexible filaments like TPU, you need a pattern that allows movement.
- Concentric: This pattern follows the shape of the outer walls. It lets the object bend and flex easily without breaking.
How Infill Affects Your Print
Infill density has a major impact on four key aspects of your 3D print. Understanding these connections helps you make smarter choices. You can balance your needs to get the perfect outcome every time.
Strength: More infill creates a denser internal structure. This makes the print more resistant to force. A solid object can handle much more stress than a hollow one.
Weight: The amount of infill directly affects the final weight. Heavier infill adds more weight. This can be useful for creating stable bases for lamps or models. For parts that need to be light, less infill is better.
Print Time: The printer must lay down material for every part of the infill. More infill means the printer has to do more work. This leads to a longer print time. A high-density print can take hours longer than a low-density one.
Material Usage: High infill settings consume a lot of filament. If you use 100% infill for every project, you might be wasting material. Optimizing your density helps you save on filament costs.
Perfect Infill Settings for Common Prints
Getting the right infill can feel like a puzzle. To make it easier, here are some recommended settings for popular 3D printing projects. These are great starting points for any beginner.
- Phone Stands (25%): A phone stand needs to be stable but not indestructible. A 25% infill provides sufficient weight and strength to hold your device securely.
- Miniatures (10–15%): Small, detailed figures for display do not require high strength. A low infill keeps them light and prints faster, preserving fine details.
- Tool Holders (50%): A holder for wrenches or screwdrivers must be durable. Around 50% infill ensures it can support the weight of tools without breaking.
- Cosplay Props (5–10%): Wearable items like helmets and armor should be as light as possible. A low infill reduces weight, making them comfortable to wear for long periods.
- Gears or Mechanical Parts (60–80%): These parts experience constant stress and friction. A high infill of 60% or more ensures they are strong enough to function correctly and last long.
Conclusion
Infill density is one of the easiest ways to control your print’s final outcome. By adjusting it, you can balance strength, speed, and cost effectively. It gives you the power to create an object perfectly suited for its purpose. Remember also to consider the infill pattern, as it works with density to define your print’s properties.
For most of your prints, a standard setting will work just fine. Start with these simple guidelines:
- 20% is perfect for general-purpose objects and decorative models.
- 40–60% is strong for functional parts that need to be durable.
- 100% is only for special cases where maximum strength and weight are required.
Now you have the knowledge to choose your infill settings with confidence. Start experimenting with your projects and see how changing the infill transforms your results.
Frequently Asked Questions
What is infill density?
In 3D printing, most objects aren’t printed solid all the way through. Instead, they have a solid outer shell (walls) and an internal structure. Infill density refers to how full that internal structure is. It is measured as a percentage. A 0% infill means the object is completely hollow, while 100% infill means it is completely solid plastic.
Why is infill density important?
Infill density is a critical setting because it balances three main factors: how strong the part is, how heavy it is, and how much time and money it costs to print. Choosing the right percentage ensures your print succeeds without wasting plastic or taking longer than necessary.
How does infill density affect print strength?
Generally, higher density equals a stronger part. However, the returns diminish quickly. A part with 50% infill is significantly stronger than one with 10% infill, but the difference in strength between 80% and 100% is often negligible for standard use. For most decorative items, low density provides enough internal support to keep the model from collapsing.
How does it impact weight and material usage?
There is a direct correlation here.
- Higher density (50-100%): Uses more filament and results in a heavier object.
- Lower density (0-20%): Uses less filament and results in a lighter object.
If you are printing a large model, reducing the infill by even 5-10% can save a significant amount of filament.
Does infill density affect print time?
Yes, drastically. The print head has to move back and forth to create the internal structure. The denser the pattern, the more lines the printer has to draw. A solid 100% infill print can take hours (or days) longer than the same model printed at 15% infill.
What are common infill patterns?
While density is how much plastic is inside, the pattern is the shape of that plastic. Common patterns include:
- Grid/Rectilinear: A standard cross-hatch pattern. It prints fast but is average in strength.
- Triangular: Stronger than a grid because triangles resist deformation well.
- Gyroid: A wavy, organic pattern. It provides great strength in all directions and is popular because the nozzle doesn’t cross over previously printed lines, reducing print failures.
Honeycomb: Very strong and aesthetically pleasing, but can be slow to print.
What infill density is best for beginners?
For most standard prints, 15% to 20% is the sweet spot.
- Decorative items (figurines, vases): 0-15%
- Standard prints (household items, toys): 15-20%
- Functional parts (brackets, tools): 40-60%
Heavy-duty parts: 80-100%
Can I change the infill density for different parts of the same model?
Yes, but this usually requires advanced settings in your slicer software (like Cura or PrusaSlicer). You can use “modifier meshes” to tell the printer to make specific areas—like a screw hole or a thin connection point—denser than the rest of the model. This saves material while reinforcing weak spots.