
Ever started a 3D print only to find your masterpiece covered in thin, web-like strings? It’s frustrating, right? These pesky strands, known as stringing, can ruin the look of your prints and make post-processing a chore. But don’t worry—there’s a solution! It starts with understanding What Is Retraction, the key setting that helps stop oozing and eliminates those unwanted strings.
Retraction is a simple yet powerful feature in 3D printing that helps prevent imperfections in your prints. It works by pulling the filament back into the nozzle during non-printing movements, preventing excess material from oozing out. This small adjustment can make a big difference in achieving clean, professional-looking prints—especially if you’re running multiple jobs on the best 3D printer for small business setups.
In this guide, we’ll break down everything you need to know about retraction. Whether you’re a DIY enthusiast or a small business owner, you’ll learn how to fine-tune your settings and say goodbye to oozing and stringing for good. Let’s dive in!

What Is Retraction in 3D Printing?
Picture this: You’re pouring syrup onto pancakes, but you stop mid-pour to move the bottle to another plate. If you don’t tilt the bottle back, syrup drips everywhere, making a sticky mess. In 3D printing, retraction is the equivalent of tilting the bottle back. It’s a feature that pulls filament back into the nozzle during non-printing movements, preventing it from leaking or “oozing” onto your print.
Retraction works by relieving pressure in the hot end—the part of the printer where the filament melts. This pressure, if left unchecked, forces molten filament to flow out even when the printer isn’t actively printing. By retracting the filament slightly, the printer stops this unwanted flow, ensuring that material only comes out when and where it’s needed.
For example, when comparing models like Anycubic Kobra vs Elegoo Neptune, you’ll notice that each printer handles retraction settings differently. These differences can affect stringing performance, so understanding how retraction works helps you fine-tune either machine for cleaner, more accurate prints.
Why Is Retraction Essential?
Retraction isn’t just a convenience—it’s a necessity for clean, precise, and professional-quality prints. Here’s why it’s so important:
- Prevents Stringing: Without retraction, thin strands of filament, known as “strings,” can form between different parts of your print. These strings are not only unsightly but can also interfere with your model’s functionality.
- Reduces Blobs and Zits: Excess filament can create small blobs or zits on the surface of your print. These imperfections can ruin the smoothness of your design and require extra post-processing to fix.
- Improves Dimensional Accuracy: In 3D printing, even a small amount of misplaced filament can affect your model’s dimensions. Retraction ensures that filament only flows where it’s supposed to, maintaining the accuracy of your print.
- Saves Time on Post-Processing: Cleaning up strings, blobs, and other imperfections after printing can be time-consuming. Proper retraction settings minimize these issues, saving you time and effort.
How Retraction Works: A Behind-the-Scenes Look
Retraction might seem like a simple feature, but a lot is happening behind the scenes. Here’s how it works:
- Filament Pullback: When the printer’s nozzle moves to a new location, the extruder motor pulls the filament back slightly. This reduces pressure in the hot end and stops the flow of molten filament.
- Controlled Movement: The printer carefully calculates how far and how fast to retract the filament. Too much retraction can cause clogs, while too little won’t stop oozing.
- Resuming Flow: Once the nozzle reaches its new location, the filament is pushed back into the hot end, ready to resume printing. This process happens in milliseconds, ensuring a seamless transition.
The Science Behind Retraction: Why It Works
Retraction is all about managing pressure and viscosity. When filament melts in the hot end, it becomes a semi-liquid. This molten filament is under constant pressure from the extruder, which pushes it through the nozzle. Retraction temporarily relieves this pressure, preventing the filament from being forced out.
However, retraction doesn’t “suck” molten filament back into the nozzle. Once filament melts, it can’t be pulled back up. Instead, retraction works by pulling the solid filament above the melt zone, reducing the pressure that drives the flow of molten material. It’s a subtle yet effective way to control the filament’s behavior.
When Retraction Goes Wrong: Common Pitfalls
While retraction is a powerful tool, it’s not foolproof. Using the wrong settings can lead to problems such as:
- Clogs: Retracting too much filament can cause it to jam in the nozzle.
- Under-Extrusion: If the filament isn’t pushed back into the hot end properly, it can result in gaps or weak spots in your print.
- Increased Print Time: Excessive retraction can slow your print, as the printer spends more time retracting and advancing the filament.
Why Retraction Is a Game-Changer for Precision
Retraction is more than just a feature—it’s a game-changer for anyone looking to achieve professional-quality prints. Whether you’re printing intricate designs, functional parts, or artistic models, retraction ensures that every detail is crisp and clean. It’s the difference between a print that looks homemade and one that looks like it came from a high-end manufacturing facility.
By mastering retraction, you can unlock the full potential of your 3D printer, producing prints that are not only visually stunning but also structurally sound.
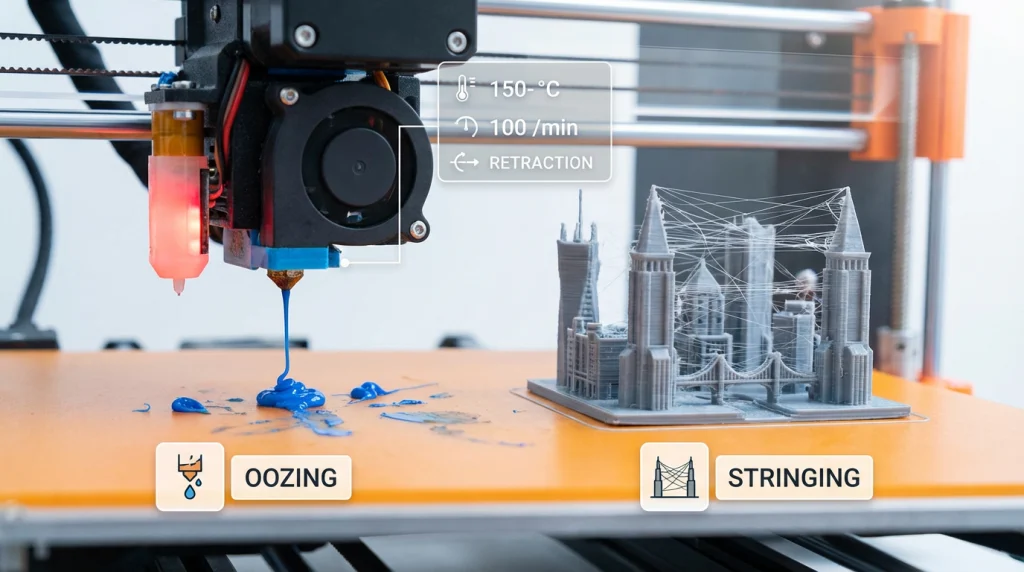
Common Problems: Oozing and Stringing
When it comes to 3D printing, oozing and stringing are two pesky problems that can turn a perfect design into a frustrating mess. Let’s break them down and explore how they impact your prints.
What is Oozing?
Oozing happens when melted filament drips out of the nozzle during non-printing movements. Think of it like a leaky faucet—filament escapes when it shouldn’t, leaving behind blobs or smudges on your print. This often occurs because the nozzle remains under pressure or the filament is too hot and runny.
What is Stringing?
Stringing, also known as “cobwebbing” or “whiskers,” occurs when thin strands of filament stretch between different parts of your print. It’s like a spider spun a web across your model. This happens when the nozzle moves between sections without properly retracting the filament, allowing it to ooze and form strings.
How These Issues Affect Print Quality
Both oozing and stringing can significantly impact the final look and feel of your 3D prints:
- Oozing creates rough patches or blobs on the surface, making the print look uneven and unpolished.
- Stringing leaves behind unsightly threads that require extra cleanup, adding time and effort to post-processing.
These problems don’t just affect aesthetics—they can also waste filament and reduce the precision of intricate designs.
A Relatable Example
Picture this: You’re printing a model with multiple towers, like a miniature cityscape. Instead of clean, sharp structures, you notice thin plastic threads connecting the towers, like a web. That’s stringing. Meanwhile, blobs of filament might appear at the base of each tower, a clear sign of oozing. These flaws can make your print look sloppy and require extra work to fix.
By understanding these common issues, you’re one step closer to achieving flawless prints. With the right adjustments, you can say goodbye to oozing and stringing for good.
How Retraction Works in 3D Printing
Retraction is a process where the 3D printer pulls back the filament slightly during non-printing movements. This prevents excess material from oozing out of the nozzle, which can cause stringing or blobs on your print. Think of it like pulling back a syringe plunger to stop liquid from dripping.
Step-by-Step Process of Retraction
- Filament Pullback: When the printer head moves to a new location, the extruder motor reverses slightly. This pulls the filament back into the nozzle, relieving pressure and stopping the flow of molten material.
- Travel Movement: The printer head moves to the next printing area without extruding filament. This ensures no unwanted material is deposited during the transition.
- Filament Reloading: Once the printer head reaches the new location, the extruder pushes the filament forward again. This prepares the nozzle to resume printing seamlessly.
Role of the Extruder and Filament
- Extruder: The extruder motor controls the retraction process. It determines how far and how fast the filament is pulled back. For example, Bowden extruders often require longer retraction distances due to the filament’s path through a tube.
- Filament: Different materials behave differently during retraction. Flexible filaments like TPU may stretch instead of retracting cleanly, requiring special adjustments.
Simple Analogy
Imagine squeezing a tube of toothpaste. If you stop squeezing but keep moving the tube, toothpaste will still ooze out. Retraction is like pulling the toothpaste back into the tube before moving it, ensuring no mess is left behind.
Retraction Settings: What to Adjust
Fine-tuning your retraction settings is key to achieving clean, string-free 3D prints. Here are the four main settings to focus on, along with simple explanations and their impact:
1. Retraction Distance
- What It Is: The length of filament pulled back into the extruder during retraction.
- Why It Matters: A longer retraction distance reduces stringing by preventing excess filament from oozing. However, too much retraction can cause clogs or filament grinding.
- Recommended Range:
- Direct Drive Extruders: 0.5–2 mm.
- Bowden Extruders: 4–7 mm (or up to 15 mm for longer Bowden tubes).
- How to Adjust: Start with small increments (e.g., 0.5 mm) and test until stringing is minimized without causing clogs.
2. Retraction Speed
- What It Is: The speed at which the filament is retracted and pushed back into the nozzle.
- Why It Matters: Faster speeds reduce stringing but can lead to filament breakage or wear. Slower speeds may not relieve pressure quickly enough, causing oozing.
- Recommended Range: 30–60 mm/s for most setups.
- How to Adjust: Begin with the slicer’s default speed and tweak in 5 mm/s increments. Test until you find the balance between speed and print quality.
3. Minimum Travel Distance
- What It Is: The minimum distance the nozzle must travel before retraction is triggered.
- Why It Matters: This setting prevents unnecessary retractions in small areas, reducing the risk of clogs and wear on the filament.
- Recommended Range: 1–2 mm.
- How to Adjust: Increase the distance if you notice frequent retractions in tight spaces, but ensure it doesn’t lead to stringing.
4. Z-Hop (Optional)
- What It Is: Lifts the nozzle slightly during travel moves to avoid collisions with the print.
- Why It Matters: Z-Hop prevents the nozzle from knocking over supports or previously printed layers. However, it can increase stringing and print time.
- Recommended Range: 0.2–0.4 mm (or double your layer height).
- How to Adjust: Enable Z-Hop only when printing models with overhangs or delicate features. Keep the lift height as low as possible to minimize stringing.

How to Stop Oozing and Stringing in 3D Printing
Few things are more frustrating than a 3D print covered in tiny plastic strings. This issue, known as stringing or oozing, happens when filament leaks from the nozzle. It creates web-like strands between separate parts of your model. Luckily, you can fix this problem with a few adjustments. These practical tips will help you get clean, string-free prints.
Adjust Your Retraction Settings
Retraction is your first line of defense against stringing. It pulls the filament back slightly into the nozzle. This action stops it from dripping during travel moves. If you see strings, your retraction settings probably need a tune-up.
Retraction Distance
Retraction distance is how far the filament is pulled back. More distance usually means less oozing. However, too much can cause clogs. For direct-drive extruders, a distance of 0.5-2.0mm is a good start. Bowden extruders need a longer distance, often up to 15mm. Try increasing your distance by 1mm at a time. Then, run a test print to see the result.
Retraction Speed
Retraction speed is how fast the filament retracts. A slow speed might let plastic ooze before the move is complete. A speed that is too fast can grind your filament. This can lead to clogs or gaps in your print. A good speed range is often 20-100 mm/s. Experiment to find the best speed for your material.
Optimize Your Print Temperature
Your nozzle temperature greatly affects print quality. A high temperature makes the filament very liquid. This runny plastic leaks easily from the nozzle. Lowering the temperature makes the filament thicker. This reduces unwanted oozing.
Start by lowering your nozzle temperature by 5-10 degrees. You can find the best temperature using a temperature tower test print. This special model prints at different temperatures. It shows you which setting gives the cleanest results. Be careful not to go below the filament maker’s minimum temperature. Doing so can cause extrusion problems.
Use the Right Filament Type
Some filaments are more prone to stringing than others. PETG is well-known for creating strings due to its properties. PLA and ABS can also have this issue. If you struggle with one material, try another.
Also, make sure your filament is dry. Many filaments absorb moisture from the air. This moisture turns to steam in the hot nozzle. The steam creates extra pressure. This forces plastic out and causes oozing. Store your spools in an airtight container with desiccant packs. If you think your filament is wet, you can dry it in a filament dryer or a low-temperature oven.
Keep Your Nozzle Clean
A dirty nozzle can make stringing worse. Old filament residue can build up on the nozzle tip. This buildup can snag the fresh filament. It then drags thin strings across your print.
Before each print, check your nozzle. While it is hot, wipe it with a damp cloth or a brass brush. This removes any stuck-on plastic. You should also clean the inside of the nozzle. A small needle can clear out minor clogs. For bigger blockages, the “cold pull” method is very effective. If your nozzle is old and worn, replacing it is a great idea. A new, clean nozzle often solves many printing issues.
Troubleshooting Advice for Beginners
Fixing stringing is a process of trial and error. Here are some simple steps to follow:
- Start with Retraction: Download a retraction test model. Tweak the distance and speed settings until the strings disappear.
- Check Temperature: If retraction changes don’t work, print a temperature tower. This will help you find the ideal heat setting.
- Dry Your Filament: If you still see strings, try drying your filament. Wet filament is a common cause of oozing.
- Clean Your Nozzle: A thorough nozzle cleaning can make a huge difference.
By following these tips, you can stop oozing and stringing. You will achieve cleaner, more professional-looking 3D prints.
Tools and Tests to Perfect Retraction
Achieving the perfect retraction settings is essential for clean, string-free 3D prints. Here are some tools, tests, and resources to help you fine-tune your printer for optimal results.
1. Calibration Tools for Retraction
- Retraction Towers: These are specialized test models designed to evaluate different retraction settings. Each section of the tower represents a specific retraction length or speed. By printing a retraction tower, you can visually identify the settings that minimize stringing and oozing.
- How to Use: Adjust the retraction length and speed in your slicer software (e.g., OrcaSlicer or SuperSlicer). Print the tower and analyze which section has the cleanest results.
- Pro Tip: Start with a small range of retraction lengths (e.g., 0.5mm to 2mm for direct drive extruders) and increase gradually.
- XYZ Calibration Cube: This simple cube with X, Y, and Z labels helps you check dimensional accuracy and extrusion consistency. It’s a great starting point for overall printer calibration.
- Download: Available for free on platforms like Thingiverse.
- Multi-Test Prints: These models combine multiple tests, such as overhangs, bridges, and stringing, into a single print. They’re ideal for evaluating multiple aspects of your printer’s performance at once.
2. Testing and Fine-Tuning Retraction Settings
- Step-by-Step Process:
- Start with Default Settings: Most slicers provide a baseline for retraction distance and speed. For example, 0.5mm at 30mm/s for direct drive extruders.
- Print a Retraction Tower: Use slicer tools like OrcaSlicer’s built-in retraction test feature. Adjust the start and end retraction lengths and print the tower.
- Analyze Results: Look for the section with minimal stringing and clean transitions. This indicates the optimal retraction length and speed.
- Iterate: If stringing persists, tweak other settings like print temperature or travel speed.
- Key Parameters to Adjust:
- Retraction Distance: The amount of filament pulled back. Direct-drive extruders typically require less retraction (0.5–2mm) than Bowden setups (2–6mm).
- Retraction Speed: The speed at which the filament is retracted. Start with 30 mm/s and adjust based on the results.
- Z-Hop: Lifting the nozzle during travel can prevent scratches but may increase stringing. Use sparingly (0.2–0.3mm).
3. Free Resources and Software for Calibration
- OrcaSlicer: A user-friendly slicer with built-in retraction calibration tools. It allows you to generate retraction towers and fine-tune settings for different filaments.
- Download: Available on GitHub.
- SuperSlicer: Offers advanced calibration tools, including retraction and extrusion tests. It’s an excellent choice for experienced users.
- Thingiverse: A treasure trove of free test models, including retraction towers and calibration cubes. Search for “retraction test” or “calibration cube” to get started.
- Anycubic Resources: The Anycubic website provides a variety of test models and guides for FDM and resin printers. Check out their calibration test prints.
By using these tools and following a systematic approach, you can eliminate stringing and achieve cleaner, more professional-looking prints. Remember, patience and experimentation are key to mastering retraction settings!
Summery
Retraction is a game-changer for achieving clean and professional 3D prints. By pulling back the filament during non-printing movements it prevents oozing and stringing, which can otherwise ruin the quality of your prints. Mastering retraction settings, such as distance and speed, ensures your prints are free from unwanted blobs and strings.
Experimentation is key to finding the perfect balance for your printer and filament type. Start with small adjustments and test frequently to see what works best. Tools like calibration cubes or stringing tests can help you fine-tune your settings effectively.
Frequently Asked Questions
What Happens if Retraction is Too High?
If your retraction settings are too high, several issues can arise:
- Heat Creep: Excessive retraction can pull molten filament into the cold zone of the extruder. This can cause the filament to solidify and clog the nozzle.
- Under-Extrusion: Over-retraction may leave the nozzle empty, leading to gaps or weak layers when printing resumes.
- Filament Damage: The extruder gear may grind or flatten the filament, reducing its smooth feeding.
To avoid these problems, keep retraction distances moderate. For direct-drive extruders, 1-2 mm is often sufficient. Bowden setups may require 4-6 mm due to the longer filament path.
Can Retraction Damage My Printer?
Yes, improper retraction settings can harm your printer:
- Clogs and Jams: Frequent or excessive retractions can cause filament to stick in the extruder, especially with all-metal hot ends.
- Gear Wear: High retraction speeds or distances can strain the extruder gear, leading to wear or slippage.
- Nozzle Issues: Over-retraction can increase the risk of nozzle blockages, especially with materials like PLA or flexible filaments.
To minimize risks, calibrate your retraction settings carefully and avoid extreme values.
What’s the Best Retraction Setting for PLA and ABS?
The ideal retraction settings depend on your printer and filament type:
- PLA:
- Retraction Distance: 1-2 mm (direct drive), 4-6 mm (Bowden).
- Retraction Speed: 30-60 mm/s.
- Temperature: Lowering the print temperature slightly can also reduce stringing.
- ABS:
- Retraction Distance: Similar to PLA, but slightly lower distances may work better.
- Retraction Speed: 20-40 mm/s to prevent filament damage.
- Additional Tip: Use an enclosure to maintain consistent temperatures and reduce warping.
Always test your settings with a calibration print to fine-tune for your specific setup.